Remote Talks are not presented live, they are presented by playing a video recording of your presentation. You will be online during your Talk Session to answer questions after your presentation.
You must upload your video presentation no later than May 12. See instructions below.
Remote Presentation Requirements
To present your talk remotely, you must complete the following requirements no later than May 12.
Register to attend VSS.
Make sure your MyVSS account contains your mobile number (so we can reach you onsite).
Upload a video of your talk presentation.
Notify VSS when you have completed these requirements.
Upload Your Talk Video
You are required to upload a video (.mp4 file) of your talk presentation no later than May 12. To upload your video:
On your account home page, click ‘Upload Remote Talk Video’.
Click browse and select an .mp4 file, then click Upload.
You can upload revisions at any time until the deadline. Uploading a new file will overwrite the existing file; this action cannot be undone.
Prior to VSS, we will load your video onto a laptop so it can be played during your talk period.
Video Format
Your video should be recorded in Full HD (FHD) format (1920 x 1080 pixels, 16:9 aspect ratio) and saved as a .mp4 file.
Talk Timing
All talks are strictly limited to 15 minutes. Your talk video should not exceed 12 minutes in length, allowing for a 3 minute question and answer period following your video.
Presenting Remotely
Prior to VSS we will email you a Zoom link.
Join Zoom no less than 15 before the start of your Talk Session. Regardless of your talk order, you should be online at the start of your session and remain online during the entire session.
Prior to the talk session, the AV technician will test the playing of your talk video while you are online.
At the time of talk, the AV technician will play your video (12 minutes).
After you video concludes, you will be able to take questions from the audience (3 minutes).
Notify VSS
Email is at when you have completed your remote talk presentation requirements. We must hear from you no later than May 12.
If you were approved for a remote poster presentation, here are instructions for your presentation.
Remote Presentation Requirements
To present your poster remotely, you must complete the following requirements no later than May 12(or May 4 if you need VSS to print and hang your poster):
Register to attend VSS
Upload a video of your poster
Upload a PDF of your poster
Print your poster for hanging on your poster board (see Print Your Poster below)
Notify VSS when you have completed these requirements
Deadlines
May 4 – Email your poster PDF to VSS if you need VSS to print and hang your poster. May 12 – Upload your poster video, upload poster PDF, register to attend, and notify VSS when completed.
Print Your Poster
Print your poster and arrange to have a colleague hang your poster on your assigned poster board.
IMPORTANT: If you’re unable to find someone to hang your poster, VSS can print and hang your poster. You must email us your poster PDF no later than May 4. Email your poster PDF to .
In addition to your printed poster, VSS staff will post signage noting your absence, including a QR code linking to your presentation page, and a sign-up sheet so attendees can request more information about your presentation.
Upload Poster Video
You are required to upload a video (.mp4 file) of your poster presentation no later than May 12. To upload your video:
On your account home page, click ‘View My Poster’.
On your poster presentation page, click ‘Upload Poster Video’.
Click browse and select a .mp4 file, then click Upload.
We advise you to test viewing your video after uploading to ensure it plays as expected. You can upload revisions at any time. Uploading a new file will overwrite the existing file; this action cannot be undone.
Upload Poster PDF (optional)
You may upload a one-page PDF of your poster presentation no later than May 12. To upload your PDF:
On your account home page, click ‘View My Poster’.
On your poster presentation page, click ‘Upload Poster PDF’.
Click browse and select a .pdf file, then click Upload.
We advise you to test viewing your PDF after uploading to ensure it displays as expected. You can upload revisions at any time. Uploading a new file will overwrite the existing file; this action cannot be undone.
Notify VSS
Email is at when you have completed your remote presentation requirements. We must hear from you no later than May 12.
First authors are required to register and present their talk in their assigned session. VSS policy holds that if the first author is unable to attend the meeting, the abstract must be withdrawn. See Abstract Withdrawal for more information.
Presentation Instructions
All talk sessions at VSS 2026 will be recorded and made available to VSS attendees. The talk session recordings will be posted after the VSS meeting and available on the VSS website through August 31, 2026.
Each presenter will present their slides from their own laptop. As in the past, each speaker’s laptop will be connected to a switch box that controls sending the video feed to the projector. The switchbox is controlled by the AV Technician.
Video Inset (Picture-in-Picture)
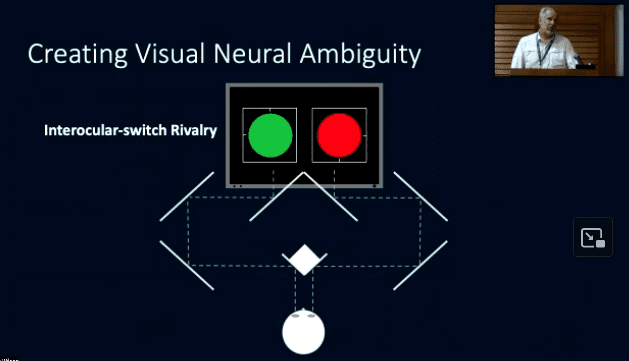
A video camera will be pointed at the lectern to capture video of you speaking. The video of you speaking will be inset into the upper right corner of the video from your laptop like the sample shown below. Space for the inset is not required. The video technician can dynamically turn the inset off or on as space allows to make sure that it does not obscure content on your slides. This “picture-in-picture” video is what will be recorded and made available on the VSS website after VSS. It’s important that speakers remain at the lectern while presenting so they remain within the frame of the inset recording.
Sample of “picture-in-picture” recording
Comfort Monitor
There will be a large (70 inch) comfort monitor on the floor in front of you as you present. This monitor will display the same content as is being displayed on the screen in the room. This makes it easier for speakers to present while facing the audience (not looking at the projection screen), which will result in a better picture-in-picture recording. You will be able to use Presenter Mode on your laptop so you can see your notes on your laptop while seeing on the comfort monitor what the audience is seeing on the room screen.
Because we are recording the display from your laptop merged with the inset of you speaking, we discourage the use of using a physical laser pointer to point to locations on the projection screen as this will not be visible in the recording. Instead, you should use your on-screen mouse pointer. You may also wish to use words or slide animations to clarify where the viewer should focus their attention on your slides.
Meeting Room Equipment
Each of the main talk rooms is equipped with:
Lectern and head table on a 12” riser platform.
Lectern microphone (wired) and two audience microphones (wireless).
Power at the head table for plugging in your laptop.
Data/video projector with eight-port video switch box.
You must arrive at the talk room no less than 30 minutes before the start of your session to check in, receive final instructions, and test your presentation.
Presentations are made from your Mac or PC laptop. Laptops are connected to the projector through a switch box via a numbered HDMI cable, where the number on the cable corresponds to the presentation order.
The Setup Process
Presenters set up their laptops on a table next to the lectern on the riser and connect to a numbered HDMI cable that matches the order of your presentation. If your laptop does not have a HDMI port, you will need an adapter. If you did not bring an adapter, check with the technician in the room. A limited number of adapters are available.
The technician will control the switch box and send your laptop’s video to the projector when you indicate you are ready to test.
If you are playing audio, plug the audio cable into your headphone jack and test it so we can set the sound level appropriately.
Test the microphone at the lectern. Ensure that you can adjust the height correctly.
Perform a quick test of your slides. Verify the following:
Slides project onto the screen correctly, fill the screen, and do not extend off the screen.
Slides are legible and not missing any text or graphics.
If color is important, verify how colors are projected.
Test embedded videos to verify that they play correctly.
Test audio. The technician in the room can make volume adjustments.
Test the remote control used for forwarding your slides.
Giving Your Talk
Laptops are left on the table until it is time for your talk. Power is provided so you can keep your laptop charged.
Speakers typically sit in the front row while waiting for their turn to present. When the previous talk has ended, the technician will put your laptop screen live, displaying the title slide (first slide) of your presentation. The moderator will step to the lectern and announce your talk.
Wait until the moderator has introduced you and started the talk timer, then step to the lectern to begin your presentation. It’s important that you remain at the lectern during your presentation so that you will be within the frame of the video camera for recording.
Use your mouse pointer to point at items on your slide. We discourage the use of laser pointers because this cannot be captured in the recording.
When your talk has ended, unplug the HDMI cable from your laptop and leave the lectern with your laptop so the next speaker can move to the lectern.
Talk Timing
Talk timing is the same as in previous years. Each talk is twelve minutes followed by a three-minute question and answer period. A timer is provided to help you keep time. There is no transition time allotted between talks, so it’s important that your talk start and end on time.
VSS has talk timers to help keep talks on schedule. The moderator is responsible for setting/starting/stopping the timers. The timer at the speaker podium has an LCD time display and colored lights. The talk timer counts UP from zero to 15. Here’s what the talk timing lights mean:
Talk Time – From 0 to 10 minutes: The GREENlight is on during your talk time.
Wrap Up – At 10 minutes: The YELLOW light displays and two-short beeps indicate that 2 minutes of talk time remains.
Discussion – At 12 minutes: The REDlight displays and two short beeps indicate that talk time has ended and the 3-minute question and answer period has started.
Talk Ended – At 15 minutes: The FLASHING REDlight and two long-beeps indicate that your presentation time has ended. You must stop immediately to allow the next speaker to start on time.
To facilitate the next speaker starting on time, we suggest that the next speaker go to the stage and prepare to set up during the previous speaker’s 3-minute question and answer period.
Slides Format
VSS uses widescreen projection (16:9 aspect ratio) in Talk Room 1 and Talk Room 2 (all other rooms use a 4:3 aspect ratio screen). To take full advantage of the new larger screens, you should prepare your talk presentation using widescreen slides. The projection screens are 14 feet wide by 8 feet high.
You can still use standard (4:3 aspect ratio) slides. Your slides will fill the height of the screen, but there will be blank space on each side of your slides. We will not be able to make adjustments between speakers to accommodate differing slide aspect ratios; the projection screen will be set only for widescreen slides.
If you are giving a presentation in a room where a pop-up screens is used, the aspect ratio is 4:3. For the best quality display, set your video resolution to widescreen 1080p resolution (1920×1080). This is the native resolution of the video projector. Other resolutions will work, but the projector will need to adjust the resolution for projection. This can sometimes result in a lower quality image.
Recommendations
As a precaution, always bring two copies of your presentation with you to the meeting. Bring a copy of your presentation with you to the talk room on a USB flash drive. Should you encounter a problem using your own computer, this facilitates presenting on another computer. A spare PC laptop is available in each talk room and connected to the projector.
We recommend that no critical information be near the edge of your slide. Alignment of the video projector and screen can vary, which can cause the edge of the projected image to be cut off.
Your laptop must have a way to connect to a standard HDMI cable. If your laptop requires a HDMI adapter, be sure to bring it and know how to use it; otherwise, connection to the projector may not be possible. VSS has a limited number of HDMI adapters, and we cannot guarantee that we will have the one you need.
Insure that you know how to activate the external video port of the laptop. Instructions should be in your operator’s manual. Generally on PCs, a Function Key (or Shift plus a Function Key) activates the external port.
If you use a Macintosh laptop, be sure you know how to keep the external port active. Macintosh computers automatically detect the presence of a video projector when the computer boots and the external port is activated. Unfortunately, if the projector is disconnected while the computer is awake, the port is deactivated and a time-consuming reboot is necessary. To avoid this problem, test your presentation before your session and, before disconnecting the projector from the computer, put the computer into Sleep mode. If you do not wake the computer before the projector is reattached, the external port will stay active.
First authors are required to register and present their poster in their assigned poster session.
VSS policy holds that if the first author is unable to attend the meeting, the abstract must be withdrawn. See Abstract Withdrawals for more information.
Posters not presented at VSS will not be published in JOV. You may post your materials on the board assigned to you at any time after the “Set-up Begins” time but before the beginning of the assigned poster session. You must remove your poster promptly, no later than the “Take-down Complete” time. See the program for set-up and take-down times. Any posters left up after the “Take-down Complete” time may be discarded.
Poster Specifications
Poster boards are 8 feet wide by 4 feet tall (243.8 by 121.9 cm), however, the actual usable board space is 90 inches wide by 42 inches tall (228.6 x 106.6 cm). Figures and type should be easily seen from a distance of 6-8 feet. Use clear graphics and large type to accomplish this.
Sample Poster Boards
Supplies and Equipment
Pushpins are provided at each poster board to mount your poster to the board. Additional pushpins are available near the poster room entrance. Tape, glue and other adhesives are not to be used on the poster boards.
Poster boards are numbered in the upper right of the board. The last three digits of your abstract number signifies your poster board number.
Contact signup sheets are available from the VSS staff person in the poster room. Pin the contact signup sheet on your board if you would like people to leave their name and email for future contact.
Chairs are positioned between each board for seating. Power is not provided at your poster board.
Optional Poster PDFs
Poster presenters may upload an optional one-page PDF of their poster to the VSS website. Registered attendees are able to view your PDF from your poster presentation page or download it. Poster PDFs are available for viewing on the VSS website through August 31, 2026.
Uploading Your Poster PDFs
To upload your Poster PDF, log in to your MyVSS account and click ‘View My Poster’ to display your poster information page. Look for controls in a yellow box (visible only to you) to upload your PDF.
We advise you to test viewing your PDF after uploading to ensure it display as expected. You can upload revisions at any time. Uploading a new file will overwrite the existing file; this action cannot be undone.
Poster QR Code
To assist attendees who are visiting your poster, you can generate a QR to place on your poster. Attendees scanning the QR code will be taken to your Poster Presentation page where they can read your poster abstract.
To Generate Your Poster QR Code
To generate your poster QR code, log in to your MyVSS account and click ‘View My Poster’ to display your poster information page. Look for controls in a yellow box (visible only to you) to generate your QR code.
Suggestions for Creating Effective Posters
Prepare a title banner indicating abstract title, author(s) and affiliation(s). Lettering should be at least one inch high.
Minimize narrative.
For figures, use dark colors on white or light backgrounds. Figures should be designed to be viewed from a distance (about three feet).
Use large type and short separated paragraphs.
Do not set entire paragraphs in boldface or capital letters.
Numbered or bulleted lists are a concise but effective way to convey a series of points.
It is not necessary to post a copy of your abstract.
Poster Schedule
Morning Poster Schedule
Setup: 8:00 – 8:30 am Session: 8:30 am – 12:30 pm Take down: 12:30 – 1:00 pm
Thank you for accepting the important task of moderating a Talk Session at VSS. Besides introducing each speaker, you are also responsible for ensuring that each talk starts and ends precisely on time. Below are some suggestions to help make your session run smoothly.
IMPORTANT: If you are unable to moderate, please contact VSS as early as possible and we will arrange for a replacement.
Time Keeping
A primary responsibility of the moderator is to keep the session on time. It’s important that all talks start and stop at the scheduled time. Here are some pointers:
Instruct the presenters that all talks must start on time and must adhere to the 15 minute time limit, which is a 12-minute presentation followed by a 3-minute discussion period.
Tell the speakers that you will not allow extra time for the talk. There should be time for questions and people should have time to switch rooms.
Make sure that your watch (or phone) is indicating the correct, current time.
To facilitate the talk starting on time, during the current speaker’s 3-minute discussion period, the next speaker should get set up on the platform. Explain this process to all speakers.
If a talk finishes early, or if a talk is cancelled or the presenter does not show up, you must wait until the appropriate quarter-hour start time to introduce the next talk.
Explain to the speakers how the timer works and what the light signals mean. Explain how you will indicate when it is time to wrap up.
Remind presenters that you are responsible for making the decision to move on to the next talk.
Make sure the presenters take seats close to you in the front row.
Working the Talk Timers
Failing to start the talk timer is the most common mistake made by moderators. Remember to start the talk timer immediately after introducing the speaker. To start the timer at the start of each talk:
Press the Start/Stop button to stop the timer.
Press the Clear button to reset the timer to zero.
Press the Start/Stop button to start the timer.
Talk Timer Lights
The talk timer counts UP from zero to 15. Here’s what the talk timing lights mean:
Talk Time – From 0 to 10 minutes: The GREENlight is on during the talk time.
Wrap Up – At 10 minutes: The YELLOW light displays and two-short beeps indicate that 2 minutes of talk time remains.
Discussion – At 12 minutes: The REDlight displays and two short beeps indicate that talk time has ended and the 3-minute question and answer period has started.
Talk Ended – At 15 minutes: The FLASHING REDlight and two long-beeps indicate that the presentation time has ended. You must stop immediately to allow the next speaker to start on time.
Moderating Your Talk Session
Before Your Session
Arrive at least 30 minutes before your session start time.
The VSS Staff person in the room will have a printed moderator sheet for you. This sheet lists the talks, speakers, and start time of each talk. On the back is room for making notes about the session.
Introduce yourself to each of the speakers and to the technician. VSS Staff and an AV Technician are present prior to your session to oversee preparations and answer any questions. The AV Technician is in the room at all times. In addition, a member of the Board of Directors will attend the session and can help with situations.
If you are a speaker or co-author in this session, before the session begins, find another person to perform moderator duties for your talk (introduce your talk, keep time, and moderate questions).
Confirm that all speakers are present. Report any missing speakers to the VSS Staff person in the room.
Make sure that there are NO DRINKS on the table with the computers to avoid costly accidents.
Ensure that all presenters have set up their computers and tested the projection of their presentation. Ask them to test audio and video, if any.
Ask the presenters take seats close to you in the front row.
Familiarize all speakers with the talk room equipment:
Microphones – Speakers can use either the lectern microphone or the Lavaliere (wireless lapel microphone).
Mouse Pointer – Test the mouse pointer and give it to the speaker.
Talk Timers – Make sure that all speakers understand what the timing lights mean.
Switch Box – The technician in the room will work the switch box to control which computer’s display is being projected onto the room screen.
At the Start of Your Session
In front of the lectern is a large “confidence monitor” that allows you to see what is being projected and recorded. It’s important that you stand at the lectern so you are within the frame of the video camera that is recording the session.
Introduce yourself.
Welcome the audience and announce the title of the session.
For Each Talk
The AV Technician will put the first slide of the talk on the screen. Introduce the title of the presentation and the speaker.
Start the timer and step away from the lectern so the speaker can step up to the lectern.
When the red light appears on the timer (at 12 minutes) move to the stage to make it clear to the speaker that their presentation time is nearing end.
You decide (not the presenter) who asks questions. So you invite the audience.
If possible, prepare a question to get the discussion started. If there are no more questions, no worries, take a break. Just make sure that the next talk starts on time (no earlier).
Indicate the next speaker to come on stage and set up his/her computer. Speakers have the option of leaving their laptop on the table with the AV Technician and use the confidence monitor for viewing their presentation, or, if they prefer or need to use presenter view, they can move their laptop to the lectern (being careful to keep all cables connected).
Make sure that that the next speaker can start on time (don’t accept when presenters claim time ‘I have to answer this, it is very important…’ etc. You are the boss!
Remote Talk Presentations
If your session has a talk that will be presented remotely, then the speaker has uploaded a recording of their presentation, which has been transferred onto a laptop in the talk room and will be played instead of a live presentation. Remote talk presenters were previously sent these Remote Talk Presentation instructions, The process is:
The AV technician will have the speaker on Zoom (from the beginning of the session).
The technician will play the recording of the presentation.
At the end of the presentation, the technician will put the Zoom session on-screen so the remote presenter can answer questions.
At the End of Your Session
Thank the audience and the speakers.
Have a brief chat with the speakers, technical staff, and Board member to determine if there were issues that should be communicated to the VSS Staff.
Make notes on the back of your Moderator sheet and turn it in to VSS Staff, board member, or the Registration Desk.
Thank you for organizing a symposium for VSS. Besides introducing each speaker, you are also responsible for ensuring that your symposium session stay on time. Below are some suggestions to help make your session run smoothly.
You should first familiarize yourself with the Talk Presenter Instructions. All instructions apply, except for those related to the talk timers.
Staying on Time
Unlike talk session presentations, symposium talks do not adhere to a strict 15 minutes per talk. As the symposium organizer, you are free to allocate any time you like to each talk. Be sure to let your speakers know how much time they have to talk and how much time is allowed for questions and answers. You many also want to allocate a Q&A period at the end of the symposium session.
Symposium sessions to not use the talk session timers. You must use your watch or phone to track time. To help keep speakers on time, we provide 5 minute and 1 minutes warning signs that you can display to your speakers to let them know when they are approaching the end of the allotted talk time. You can find the warning signs in your Symposium Organizer binder.
Before Your Session
Arrive at least 30 minutes before your session start time.
Introduce yourself to each of the speakers and to the technician. VSS staff will also be present prior to your session to oversee preparations and answer any questions. In addition, a member of the Board of Directors will also attend the session and can help with situations.
Confirm that all speakers are present. Report any missing speakers to the VSS staff person in the room.
Make sure that there are NO DRINKS the table with the computers to avoid costly accidents.
Ensure that all presenters have set up their computers and tested the projection. Ask them to test audio and video, if any.
Ask the presenters take seats close to you in the front row.
Familiarize all speakers with the talk room equipment:
Microphones – Because sessions are being recorded, speakers should use the lectern microphone so they remain in the frame of the camera. Audience microphones are available for Q&A.
Laser Pointer – Test the laser pointer and give it to the speaker.
Talk Time – Make sure that all speakers know how much speaking time they have.
Switch Box – The speakers should know where the box is and what button to push to put their presentation live.
Remote Talk Presentations
If your session has a talk that will be presented remotely, then the speaker has uploaded a recording of their presentation, which has been transferred onto a laptop in the talk room and will be played instead of a live presentation. Remote talk presenters were previously sent these Remote Talk Presentation instructions, The process is:
The AV technician will have the speaker on Zoom (from the beginning of the session).
The technician will play the recording of the presentation.
At the end of the presentation, the technician will put the Zoom session on-screen so the remote presenter can answer questions.
At the End of Your Session
Have a brief chat with the speakers, technical staff, and Board member to determine if there were issues that should be communicated to the VSS staff.
Technical Assistance
If you have a problem of any kind, alert the technician in the room for assistance. The attending board member should note the problem and report it to VSS staff so it can be logged.
To withdraw an abstract prior to the meeting, the first author must send an email to vss@visionsciences.org.
Under exceptional, unavoidable circumstances, the VSS Board of Directors will consider a co-author replacement for a presentation. To request such a special substitution, a clear explanation must be given in writing in advance (send such requests to vss@visionsciences.org).
Abstracts withdrawn or not presented at the meeting will not be published in the proceedings or in the Journal of Vision.
Authors who fail to present their poster or give their talk without withdrawing their abstract may forfeit the right to present the following year.